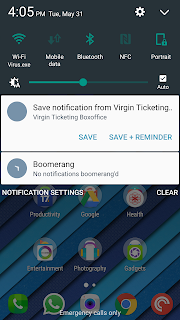
HELLO, TechinDroid readers Today im going to share you a trick to Save Notifications in Android and read it later or set up Reminder for your device notification.
I have so many apps on my Android phone, & Im getting lots of Notifications from it. Many of them can be cleared without ever reading. I’m glad there are built-in tools to block notifications from any app, but some notifications are frightfully important.
The trouble is that notifications don’t respect my time. They show up when they want to, not when I want them to.
Picture this. You’re in the middle of a busy work day. Ding! You get a notification about a message from your friends about meeting tomorrow. You want to get back to them, but you’re “in the zone” right now. However, if you don’t do it right now, you’ll forget all about it later. Wouldn’t it be easier to just set a reminder that makes this notification pop up again at the end of the day?

NotiBox, as the name goes, is an easy, simple & unified inbox of all your push notifications. NotiBox is also like an Boomerang app.its back up your lost notifications and turn off annoying ones.
'Do Not Disturb' - Stop notification alerts of all apps or only a few, in one go. NotiBox won't let them nudge you on your home screen whilst still back them up.
Download: Notibox
I have so many apps on my Android phone, & Im getting lots of Notifications from it. Many of them can be cleared without ever reading. I’m glad there are built-in tools to block notifications from any app, but some notifications are frightfully important.
The trouble is that notifications don’t respect my time. They show up when they want to, not when I want them to.
Picture this. You’re in the middle of a busy work day. Ding! You get a notification about a message from your friends about meeting tomorrow. You want to get back to them, but you’re “in the zone” right now. However, if you don’t do it right now, you’ll forget all about it later. Wouldn’t it be easier to just set a reminder that makes this notification pop up again at the end of the day?
#1.Boomerang Notifications
- Boomerang Notifications is the solution to be the reminder problem. It’s the simplest yet coolest app I have seen in a long time, and it immediately makes me wish this was a core feature in Android.

- Here’s what Boomerang does. Every time you get a new notification from select Boomerang apps, it will present two options: “Save” or “Save+Reminder”. As the names suggest, the former simply saves the notification so you can check it later, while the latter saves it and adds a reminder.
- You can choose “some time later” (to be reminded later today), “some time tomorrow” (to be reminded the next day), or “at a specific time and date” (to set exactly when you want to see that notification again). It’s all done in a few taps, and you’ll be ready to get back to work in a matter of seconds.
- Saved notifications, of course, can be viewed at any time. Boomerang has a persistent tile in your Notifications Shade, telling you how many saved items you have. A persistent tile is any tile that can’t be dismissed. In this case, Boomerang’s tile is optional. Tap it to check your saved notifications, as well as the upcoming reminders. You can even add a reminder for any saved notification by long-pressing it.
- Now, before you think Boomerang is going to become a hassle by constantly making you choose whether you want to save a notification or not, don’t worry. You get to select which apps Boomerang works its magic on. So if you like Google Inbox on Android and its reminder feature, disable it in Boomerang’s settings and continue to use it as you always do. But if you use Gmail, which doesn’t have a built-in reminder feature, then you just got it through Boomerang.
#2. NotiBox
NotiBox helps you save notification history on your phone and act on them. Your android notifications are saved on your phone only. We or any third party have no access to them.
- To get started with notibox you have to Enable app on your Accessablity Settings on your phone
- Tap on that. You will be redirected to a screen where you can enable it properly. Just toggle the button and hit the ALLOW option on the popup window.
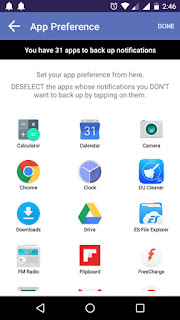
- Following that, you will get all the apps those can send notifications. You can also exclude any app if you want. Just tap and hold the app to exclude.
- The unread notifications are stored in Notibox alarm symbol which you can find it on notification bar.
'Do Not Disturb' - Stop notification alerts of all apps or only a few, in one go. NotiBox won't let them nudge you on your home screen whilst still back them up.
Download: Notibox
#3.NotifLog
Notifications come and go, sometimes mysteriously in the middle of the night, just to disappear moments later. What if you accidentally clicked or dismissed a notification, but need it back just moments later.With Notif Log, you have a functional copy of all your notifications so you know exactly what's going on at all times.
The first thing you need to know is that Notif Log isn’t a part of your existing Notifications Shade. It requires its own, but that’s not much of a bother since it creates a hotspot at your system clock. Just like you drag down from the center for your Notifications Shade, drag down from the clock time to draw the Notif Log Shade, filled with all your notifications.
- Like Boomerang, you can “snooze” a notification as a reminder by swiping left on it. The defaults are 10 minutes, 30 minutes, and “later” where you get to specify the time. You can also change these defaults — something Boomerang doesn’t let you do.
- Notif Log can’t save notifications for later, but it can pin them so they stay persistent at the top of your Notifications Shade. That means they can’t be dismissed until you unpin them, serving as a visual, always-on reminder.
- In case you don’t want to pin an item but still see it until you dismiss it, long-press any notification to rearrange the order you see.
- The free version of Notif Log, however, is plagued with an ugly ad banner at the bottom, and it uses data since it has integrated analytics. The Pro version removes these ads and the integrated analytics, which also makes it better for your Android permissions.
Download: NotifLog Pro | Mirror


No comments:
Post a Comment